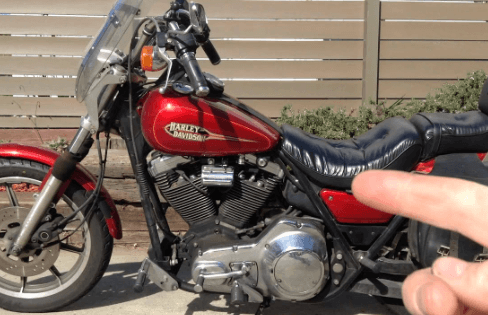
Yes, it is necessary to check the oil on a Harley while it is on the kickstand. The oil level should be checked regularly as part of the motorcycle’s maintenance routine to ensure optimal performance and longevity.
Maintaining the proper oil level is crucial for the engine’s lubrication and cooling. Neglecting to check the oil can lead to engine damage and potential breakdown.
By checking the oil on a stable kickstand, riders can accurately assess the oil level and make necessary adjustments if needed.
Regular oil checks also provide an opportunity to inspect for any signs of leaks or contamination that may require further attention. Taking the time to check the oil on a kickstand is a simple yet essential task in maintaining the health and performance of a Harley motorcycle.
The Importance of Checking Harley Oil Regularly
The Importance of Checking Harley Oil Regularly
Regularly checking the oil level in your Harley motorcycle is crucial to prevent engine damage, extend the longevity of your bike, and ensure optimal performance. Neglecting this simple maintenance task can lead to costly repairs and a shorter lifespan for your beloved machine.
When oil levels are too low, the engine components can experience excessive friction, which may result in overheating and wearing down of vital parts. On the other hand, if the oil is overfilled, it can foam up and hamper lubrication. It is vital to find the right balance and maintain the correct oil level for smooth operation.
By consistently monitoring and replenishing the oil as needed, you can extend the life of your Harley engine. Fresh, clean oil helps remove contaminants and keeps the internal parts well-lubricated, reducing friction and wear. Additionally, it aids in cooling the engine, preventing excessive heat build-up during long rides.
Regularly checking your Harley’s oil level is a simple task that can save you from costly repairs and ensure your bike performs at its best. Keep your engine running smoothly and enjoy the open road with proper oil maintenance.
The Correct Way To Check Harley Oil On Kickstand
The Correct Way to Check Harley Oil on Kickstand
To ensure the proper functioning of your Harley, it is crucial to regularly check the oil level. Here is a step-by-step guide to help you check the oil level on your Harley while it is on the kickstand.
Tools and equipment required:
– Clean rags or paper towels
– Oil dipstick or dipstick handle
– Motorcycle jack (optional)
Safety precautions to take:
– Make sure the motorcycle is on a flat and stable surface
– Ensure the engine is off and cool before checking the oil
– Wear gloves and eye protection to prevent any accidents or injuries
Start by placing your Harley on the kickstand and let it cool down if it has been running. Locate the oil dipstick, usually located on the right-hand side of the bike.
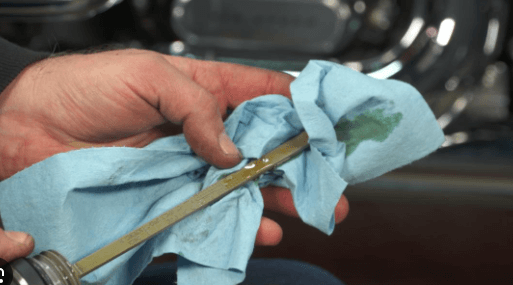
Using the dipstick handle, slowly unscrew the dipstick and wipe it clean with a rag or paper towel. Insert the dipstick back into the oil tank, making sure it goes all the way in.
Remove the dipstick again and check the oil level against the indicators or marks on the dipstick. It should be between the minimum and maximum marks. If it is low, add the recommended type and amount of oil as specified in your Harley owner’s manual.
Regularly checking the oil level on your Harley while it is on the kickstand will help ensure optimal engine performance and longevity.
Tips And Tricks For Accurate Oil Level Assessment
Common Mistakes To Avoid
To ensure an accurate assessment of your Harley’s oil level, it is essential to avoid common mistakes that can lead to incorrect readings. One of the main mistakes is checking the oil level while the motorcycle is on the kickstand.
This can result in an inaccurate reading as the oil may not be distributed evenly throughout the engine. To obtain the most precise measurement, ensure that the motorcycle is on a level surface and perfectly upright.
How To Read The Dipstick Correctly
Reading the dipstick correctly is crucial for an accurate oil level assessment. Start by removing the dipstick and wiping it clean with a rag or paper towel. Insert the dipstick back into the oil tank fully, then remove it again and take note of the oil level on the dipstick.
The dipstick usually has indicators or markings to show the desired oil level range. Make sure the oil level falls within this range for optimal performance of your Harley.
Checking Oil Color And Consistency
In addition to assessing the oil level accurately, it is important to check the oil color and consistency. Fresh oil typically has a golden amber color, while dark or dirty oil may indicate the need for an oil change. Additionally, observe the oil’s consistency. If it appears watery or milky, it could be a sign of coolant contamination, which requires immediate attention from a professional mechanic.
Warning Indicators Of Low Oil Level
Checking the oil level in your Harley-Davidson motorcycle is essential for its overall performance and longevity. Low oil levels can lead to various warning indicators and potential engine damage.
One common warning sign is engine temperature fluctuations, which can occur if there is insufficient oil to properly lubricate the engine components.
Increased engine noise can also indicate low oil levels, as the lack of lubrication causes increased friction and wear on the engine. Moreover, poor fuel efficiency is another indicator of low oil levels, as the engine works harder to compensate for the lack of lubrication.
Regularly checking your Harley’s oil level while on the kickstand can help you identify and address any oil-related issues before they escalate. By maintaining proper oil levels, you can ensure optimal performance and prolong the lifespan of your motorcycle.
Identifying Contaminated Harley Oil
Examining oil appearance and smell
Common signs of oil contamination
| Signs of Oil Contamination | Potential Causes | Consequences |
|---|---|---|
| Milky or frothy appearance | Water intrusion, condensation | Cooling system issues, potential engine damage |
| Burnt or dark color | Excessive heat, aging oil | Poor lubrication, increased friction |
| Strong, pungent odor | Burnt oil, fuel contamination | Reduced oil performance, potential engine wear |
Proper maintenance and regular oil checks are crucial for a Harley’s longevity. When checking your oil, it’s important to pay attention to the oil’s appearance and smell to identify any signs of contamination.
Common signs of oil contamination include a milky or frothy appearance, which can indicate water intrusion or condensation.
This may be due to cooling system issues, potentially causing engine damage. A burnt or dark color may suggest excessive heat or aging oil, leading to poor lubrication and increased friction.
Additionally, a strong, pungent odor can be indicative of burnt oil or fuel contamination, leading to reduced oil performance and potential engine wear.
By regularly inspecting your Harley’s oil and promptly addressing any signs of contamination, you can help maintain optimal performance and extend the life of your bike.
Recommended Oil Change Intervals For Harley Bikes
When it comes to maintaining your Harley bike, checking the oil regularly is important for its smooth performance and longevity. Although it is possible to check the oil level with the bike on the kickstand, it is recommended to do so while the bike is on a level surface for accuracy.
The frequency of oil changes depends on various factors such as the model of your Harley, your riding conditions, and the type of oil you use. Harley-Davidson provides guidelines and recommendations for oil change intervals in their owner’s manual. It is crucial to understand and follow these guidelines to ensure optimal performance of your bike.
Additionally, the type of oil you use in your Harley can also affect the recommended oil change interval. Different models may require different oil types, such as conventional, synthetic, or a blend. Harley-Davidson recommends using their own line of oils, including their fully synthetic oils.
To summarize, checking your Harley’s oil level regularly and changing it at recommended intervals is essential for maintaining the health of your bike. Adhering to the manufacturer’s guidelines and using the recommended oil types will help ensure smooth and reliable performance on the road.
Best Practices For Maintaining Proper Harley Oil Levels
Best Practices for Maintaining Proper Harley Oil Levels
Proper oil level maintenance is essential for the longevity and performance of your Harley motorcycle. Before embarking on long rides, it’s crucial to check the oil levels to ensure a smooth and hassle-free journey.
Checking oil levels:
- Park your motorcycle on a flat surface and let it cool down for a few minutes.
- Locate the oil cap and dipstick on the engine.
- Remove the dipstick, wipe it clean, and reinsert it without tightening.
- Take the dipstick out again and check the oil level. It should be between the minimum and maximum marks.
- If the oil level is below the minimum mark, add the recommended oil until it reaches the proper level.
Importance of warm-up and cool-down:
Before hitting the road, allow your Harley to warm up to ensure proper oil circulation. Similarly, after a long ride, let the motorcycle cool down before checking the oil level again to obtain accurate readings. This practice helps in maintaining optimal oil levels and prevents potential issues.
Additional maintenance tasks:
- Regularly change the oil and filter as per the manufacturer’s recommendations.
- Inspect the oil for any signs of contamination or discoloration, and address any issues promptly.
- Keep an eye on any leaks and get them fixed by a professional mechanic if necessary.
- Properly dispose of used oil and filters to protect the environment.
Maintaining proper Harley oil levels is a simple yet vital aspect of motorcycle maintenance. By following these best practices, you can ensure your bike runs smoothly and remains in excellent condition for years to come.
How To Troubleshoot Oil-related Harley Issues
Oil-related problems can affect the performance and longevity of your Harley motorcycle. Understanding common issues can help you diagnose and resolve minor problems on your own.
Common oil-related problems:
| Problem | Solution |
|---|---|
| Low oil level | Add the recommended oil to reach the appropriate level. Refer to your owner’s manual for detailed instructions. |
| Dirty oil | Regularly change the oil filter and oil, following the manufacturer’s recommended intervals. Dispose of the old oil properly. |
| Oil leaks | Inspect the gaskets, oil lines, and drain plug for any signs of leaks. Replace or repair any damaged components. |
DIY solutions for minor issues:
- Regularly check the oil level using the dipstick and top up if necessary.
- Keep the oil clean by changing it at the recommended intervals.
- Inspect the bike for any visible oil leaks and address them promptly.
When to seek professional help:
- If you are unsure about performing oil-related maintenance tasks.
- If you notice major oil leaks or significant mechanical problems.
- If your Harley experiences persistent oil-related issues despite your DIY efforts.
Frequently Asked Questions For Do You Check Harley Oil On Kickstand
Can I Check The Oil On A Harley While It’s On The Kickstand?
Yes, you can check the oil level on a Harley while it’s on the kickstand. However, it’s preferable to check the level with the motorcycle upright and on a level surface for a more accurate reading.
How Do I Check The Oil Level On My Harley While It’s On The Kickstand?
To check the oil level on your Harley while it’s on the kickstand, make sure the engine is warm and the motorcycle is upright. Remove the oil dipstick, wipe it clean, reinsert it, and then remove it again to check the level.
Make sure the oil level is within the recommended range.
Is It Necessary To Check The Oil On A Harley On The Kickstand?
While you can check the oil level on a Harley while it’s on the kickstand, it’s recommended to check it with the motorcycle upright for a more accurate reading. This ensures that the oil is distributed evenly throughout the engine, giving you a better indication of the actual oil level.
Conclusion
Checking the oil on a Harley while it’s on the kickstand is not just a matter of convenience, but also a crucial step in maintaining your bike’s performance. By ensuring that the oil level is within the recommended range, you can prevent potential engine damage and extend the lifespan of your Harley.
Regular oil checks and changes are essential for a smooth and trouble-free ride. So next time you’re in the garage, don’t forget to give your Harley the care it deserves!
Leave a Reply